
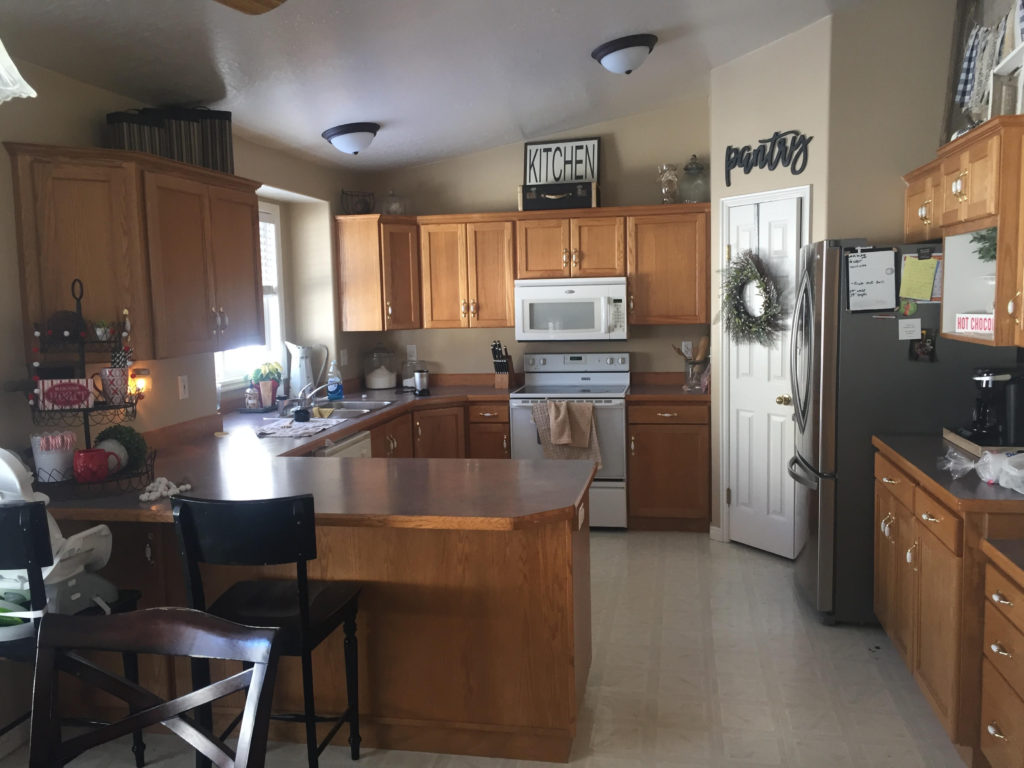
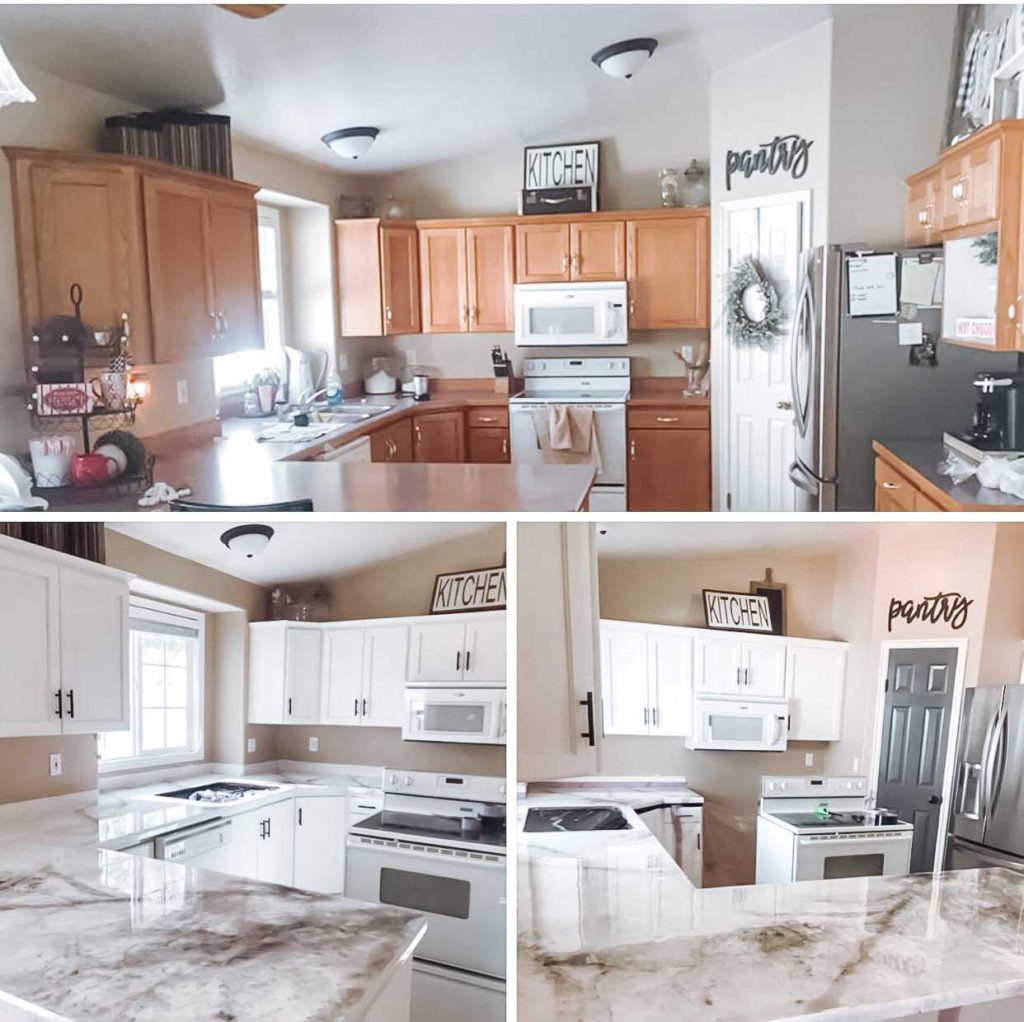
This has by far been the most exciting and drastic DIY I’ve done to date! And you guys have been asking like crazy for all the info! We saved thousands of dollars using this method for our countertops!
No, we didn’t replace them.
No, they aren’t marble.
This is the process we followed for OUR kitchen. Please do plenty of research on pouring epoxy before you undergo this project. We had a beautiful kitchen that was in great shape, but it was outdated. It didn’t fit my style and I had the hardest time trying to decorate it to my liking. I spent months researching on ways to save money on countertops, because new was not in our budget. I researched painting over them for a temporary fix until we could purchase new countertops but I read many bad reviews and decided that I wanted something more durable. I kept seeing ads for epoxy and dug deeper. It seemed very intimidating, but I knew anything would look better than our purple outdated countertops. Epoxy was also much more durable than simply painting over the countertops. It stands up against chipping, heat, etc. The company I went with was “Stone Coat Countertops Epoxy”. They have wonderful YouTube tutorials and a helpful Facebook group where I was able to find answers to my questions quickly. Their website, www.stonecoatcountertops.com, also offers a ton of valuable information including mixing recipes and FAQ’s! Again, do your homework beyond this post before you tackle epoxy.
After me and my husband learned the epoxy pouring process by watching the videos and making a supply list we made the plunge and ordered the product! Our supplies in total were around $600. Keep in mind that we have a large kitchen with 70 sq ft of countertop space. In my opinion, this is not an average sized kitchen. Most people can do epoxy for much less. Below is a list of clickable links to purchase their epoxy based on the square footage of your countertops and how much you will need. We ordered (2) 2 gallon kits, the biggest they have available.
Prepping Your Countertops
Prep work is by far the most difficult thing about this project. Make a game plan ahead of time so you don’t get overwhelmed. Make sure you have all of your supplies gathered before started. It honestly took us a few weeks to get all of our supplies rounded up. Especial with the COVID-19 pandemic going on! I’ve linked up items I used below to make it easier for you! I ordered most everything online because at the time we were on an advisement to stay home as much as possible.
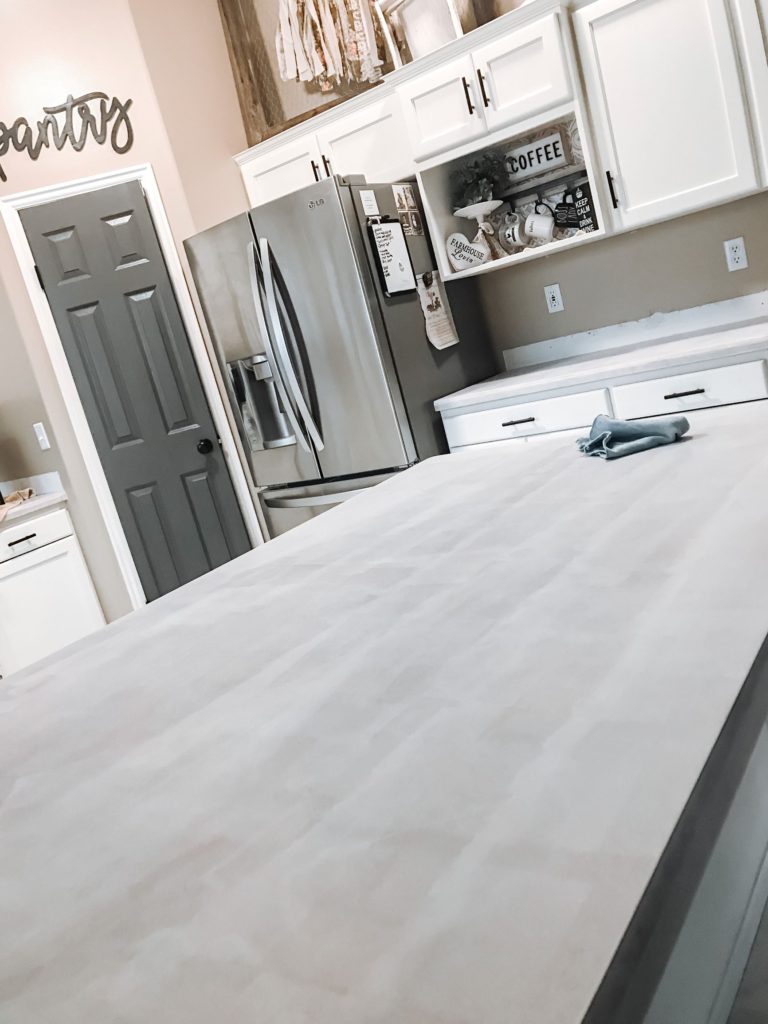
We poured over our countertops while they were in place. Some people remove and take them to their garage to work. We poured our countertops while they were in place.
1. Very first we removed our wood integrated backsplash. There were some major gaps between the wall and countertop so my husband used Bondo to fill these. After this step was already done, I saw a video where they used some kind of car window weather stripping that is probably a much better solution. We also chose to remove our sink while others don’t. Our kitchen was out of commission for four days during this project and I washed dishes in our bathroom sink. It really wasn’t bad at all. Maybe because I mentally prepared myself! ha!
2.I moved all decor and kitchen items off of the countertops and cleaned with TSP de-greaser to get EVERYTHING cleaned off.
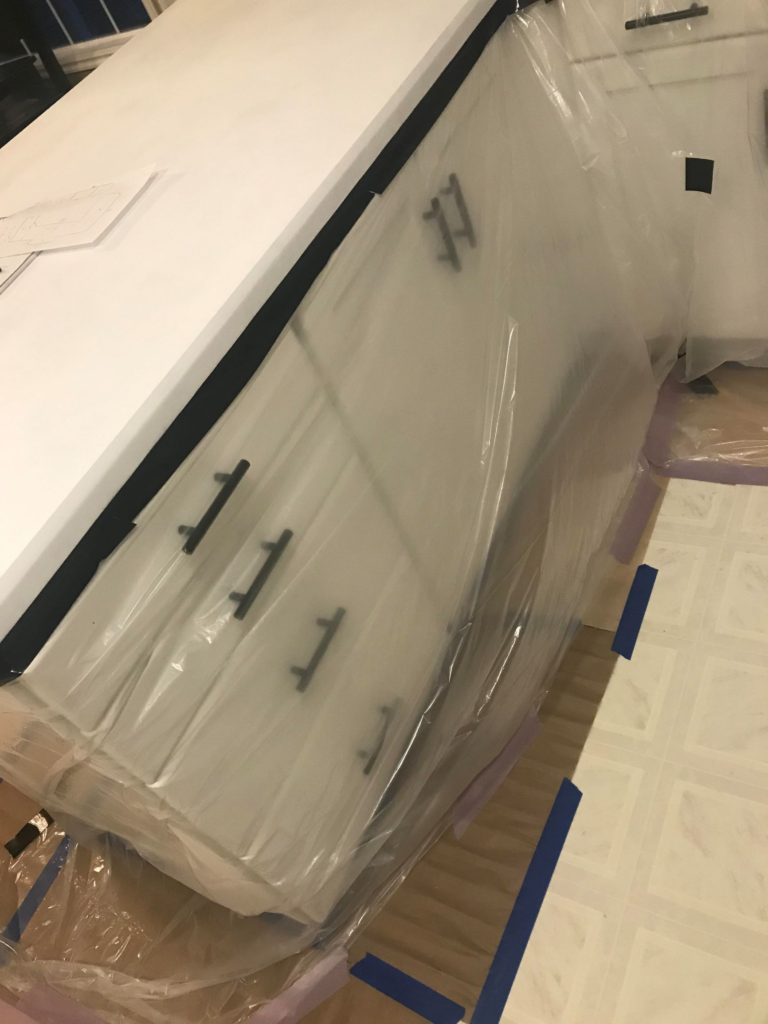
3.We taped the top of the cupboards with Scotch Delicate Surface tape, as recommended by Stone Coat Countertops, because it won’t peel paint off your cabinets (if they are painted).
4.Then we completely covered our cupboards by taping pre-taped painters plastic, directly on top of the delicate surface tape to avoid the dripping, any epoxy dripping on the cupboards. We used masking paper to partially tape our floor but weren’t super careful with the floor since we will be replacing it.
5.We then sanded our countertops with an electric palm sander ( I got one at Walmart for around $15) using 60 grit sandpaper. Roughing up the countertops is necessary to create a bond with the primer. To avoid tons of dust, I attached a shopvac to the sander as you can see in the video.
6. I then rolled on two thin coats of XIM bonding primer, lightly sanding with 220 grit sand paper between coats. I didn’t use the hand sander, just held the sandpaper in my hand.
7. Then I applied two coats of Behr Paint and Primer in One, lightly sanding with 220 grit sand paper between coats and after final coat. To apply the primer use a 1/4 inch Nap roller. These can be found at Walmart or any home improvement store.
Prep Supply List
- TSP Cleaner/Degreaser
- XIM Bonding Primer
- Scotch Delicate Surface Tape
- Pre-taped Painters Plastic
- Masking Paper
- Electric Palm Sander
- 60 grit / 220 grit Sandpaper
- Behr Paint and Primer in One
Mixing and Pouring
8. Next, was mixing and pouring the epoxy! Make sure your house is plenty warm for the epoxy to set properly. We had our house at 75 degrees or above for the entire process. You’re epoxy will need to be plenty warm to pour properly. We set ours in front of a heater for a bit. Make sure you have ALL necessary equipment before mixing parts A and B of the epoxy. Once you pour the epoxy there is only a 45 minute window to work before the epoxy sets. I promise you won’t have time to run to the store or order online for supplies. Check your supply list multiple times before starting.
List of Mixing and Pouring Supplies
- Large and Small Mixing/Measuring cups (or solo cups for small)
- Drill
- Plastic Gloves
- Paint Mixer to Attach to Drill
- Paint sticks
- Popsicle stick
- 1/8″ Square Notch Trowel (I like the one you can order directly from the Stone Coat website
- Chop Brushes from the Stone Coat Website (I used 3 total)
- Heat Gun for pushing color around
- Propane Torch for popping air bubbles
- Acetone for storing brushes when not in use and cleaning hands
- Air tight container to pour acetone and store brushes (we used a new paint can with lid from Lowes”
- Plenty of rags for drips
- Old Clothes and Shoes! This stuff WILL NOT come out of your clothes and you don’t want it sticking to your feet!
Epoxy / Resin / Colored Powder
- Stone Coat Countertops Epoxy (1/2 gallon) Kit
- Stone Coat Countertops Epoxy (1 gallon) Kit
- Stone Coat Countertops Epoxy (2 gallon) Kit
- Black Metallic Powder
- White Metallic Powder
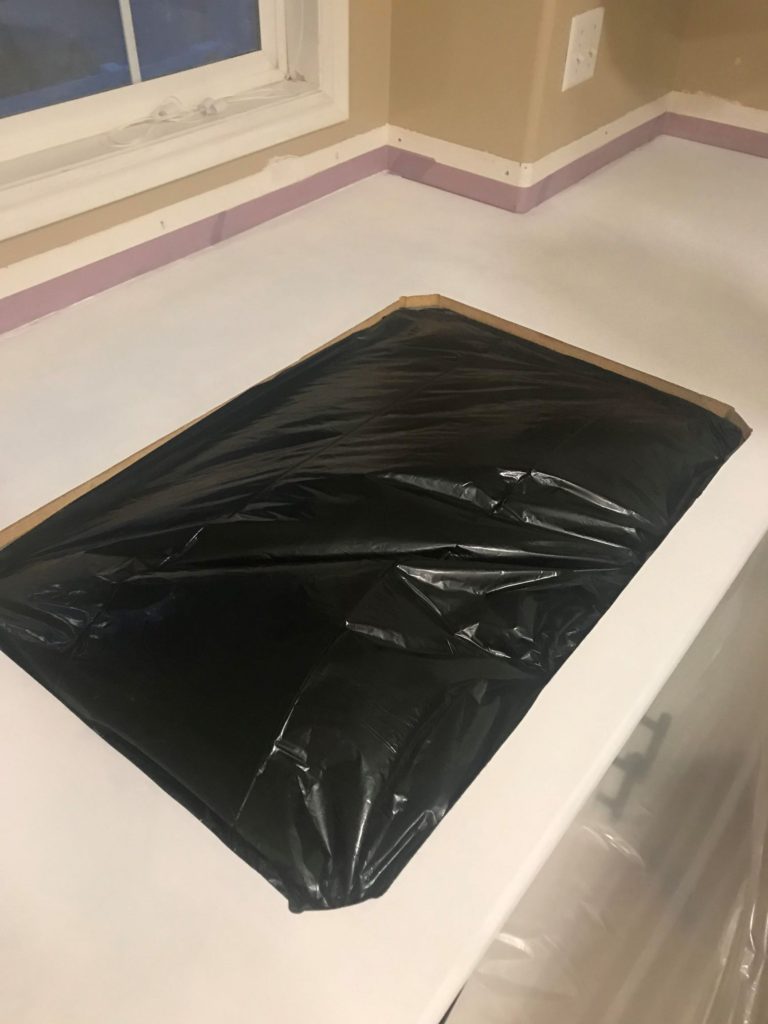
9. We used some scrap wood to do a practice pour the night before we started in the kitchen. Picture below. This is extremely important to practice your colors and to work with the consistency of the epoxy. You need to understand how to mix the epoxy and resin correctly with a 1:1 ratio or it won’t set properly and your countertops will be ruined. Mix according to package instructions! My husband calculated the square feet of our countertops and we sectioned off our pours. We made four different pours with the layout of our kitchen.
10. Measure epoxy according to package directions. Mix with the paint mixer attached to your drill for 2 minutes. This is very important so that the epoxy cures correctly.
11. Pour about 1/4 cup epoxy (depending on the size of your pour) into a small mixing cup and mix in black metallic powder for 2 minutes with a spoon or popsicle stick. This is how you will get the marble effect. Set aside to use soon after you pour the base coat.
12. Mix the white metallic powder into the rest of the epoxy according to package directions to get the white base coat. Mix for 2 minutes.
13. Pour on to prepared countertop as measured according to package instructions. Use 1/8″ square notch trowel to move epoxy as seen in my video below.
14. Use chop brush to completely break the surface tension as seen in the video. Don’t leave any part unchopped.
15. Use second chop brush to create black marble effect as seen in the video. Create veins and beautiful, real looking marble. This part is so fun! You can make it as dark or light as you like by just using a tiny bit of black. Make sure you’ve practiced using the color on the practice piece before starting.
16. Use heat gun to push the color around to look like real marble.
17. Use propane torch to pop air bubbles.
18. After four hours I scraped the drips from the underneath of the countertop with a paint stick. This is where the plastic covering the cupboards and the paper covering the floor is SO important. the epoxy is very runny and will run right down the plastic and onto the floor as is self levels.
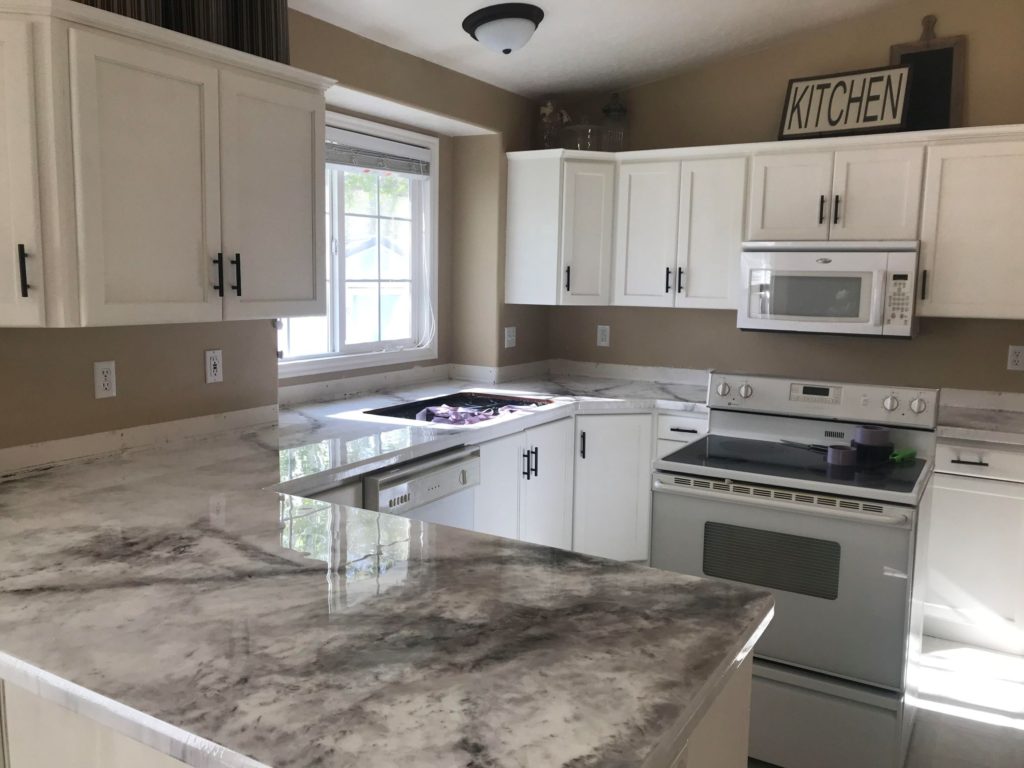
19. After the color coat is applied, wait 24 hours to mix and pour the clear coat, according to package instructions. After the clear coat is mixed and poured, again wait four hours for it to self level. Then take your paint stick and scrape the drips under the countertop. I waited another hour to be sure the epoxy was finished dripping and removed all plastic and tape. It’s beautiful right!
The actual pouring is a very fast process. My husband and I worked as a team and it worked really well. We helped each other where the other person was weak. For example, he mixed, poured, and troweled. I mixed color, chopped, and designed the veins into the countertop. As I finished designing he came through behind me with he heat gun and pushed the color our to make the pretty marble effect and then he popped the air bubbles with the propane torch. He’s more handy with the tools and I’m better in the design area. All of this can be seen in the videos below.
20. We waited four days for our epoxy to settle before reinstalling our kitchen sink. As recommended, I only used my countertops for very light use for the next 30 days. The time for the epoxy to completely cure is 30 days. I didn’t set my coffee pot, decorations, glass canisters, etc. on my countertops for 30 days until they cured. I used all plug in kitchen appliances on my kitchen table when needed.
That’s it! You won’t even recognize your kitchen after your beautiful new countertops are finished!
Leave a Reply